Quickstart
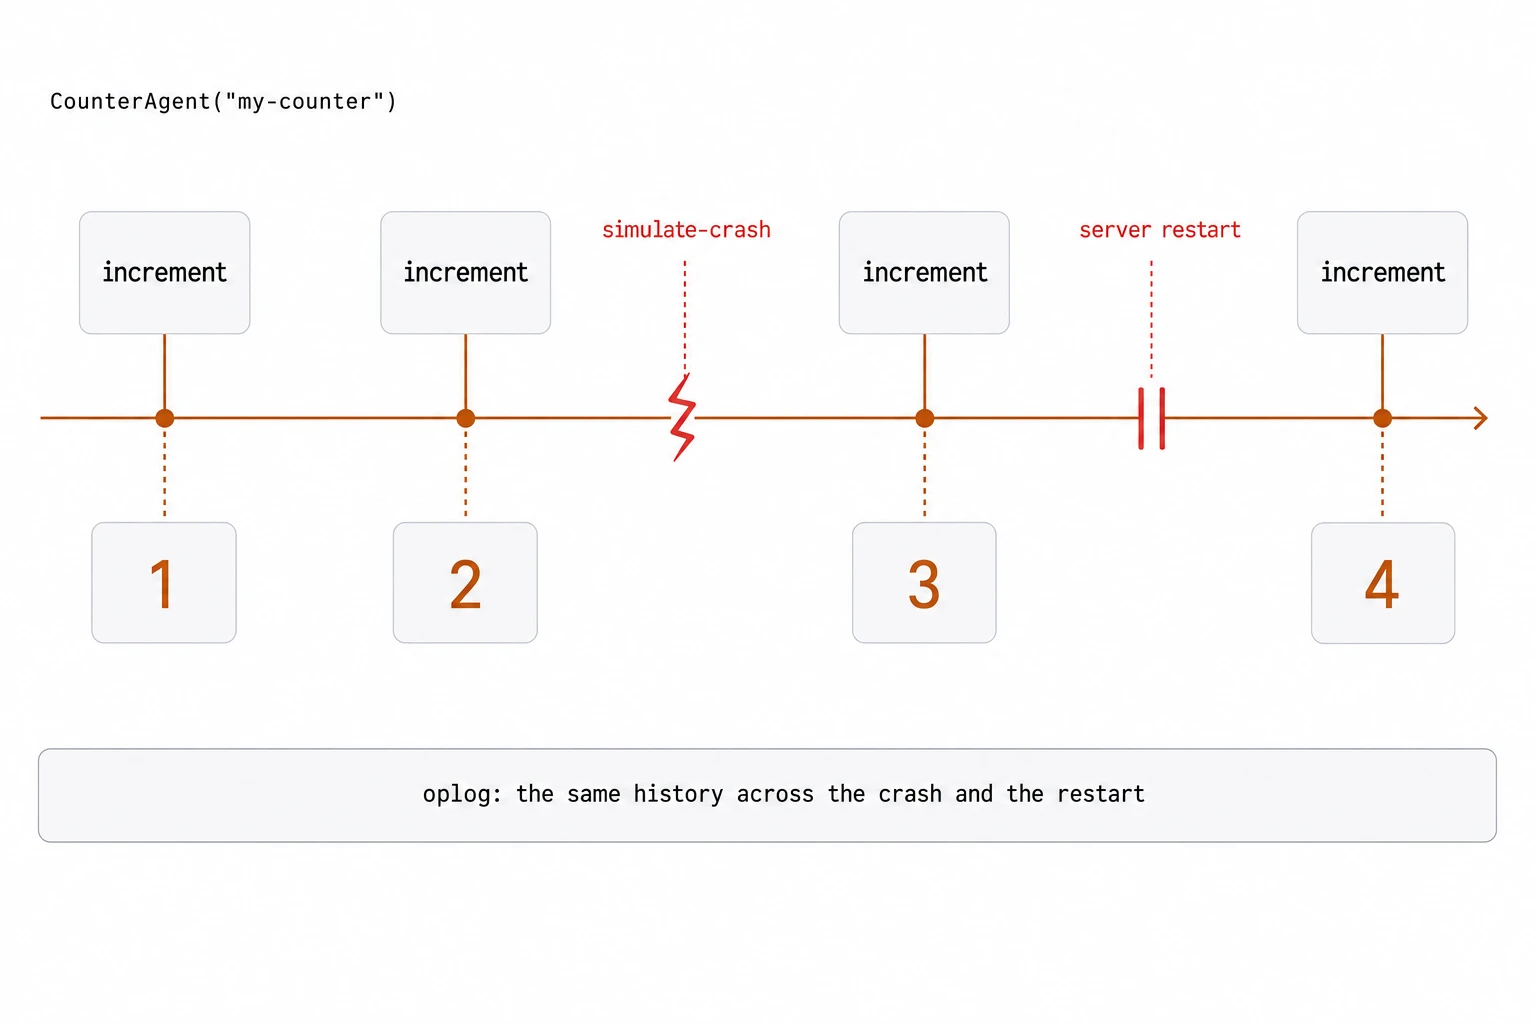
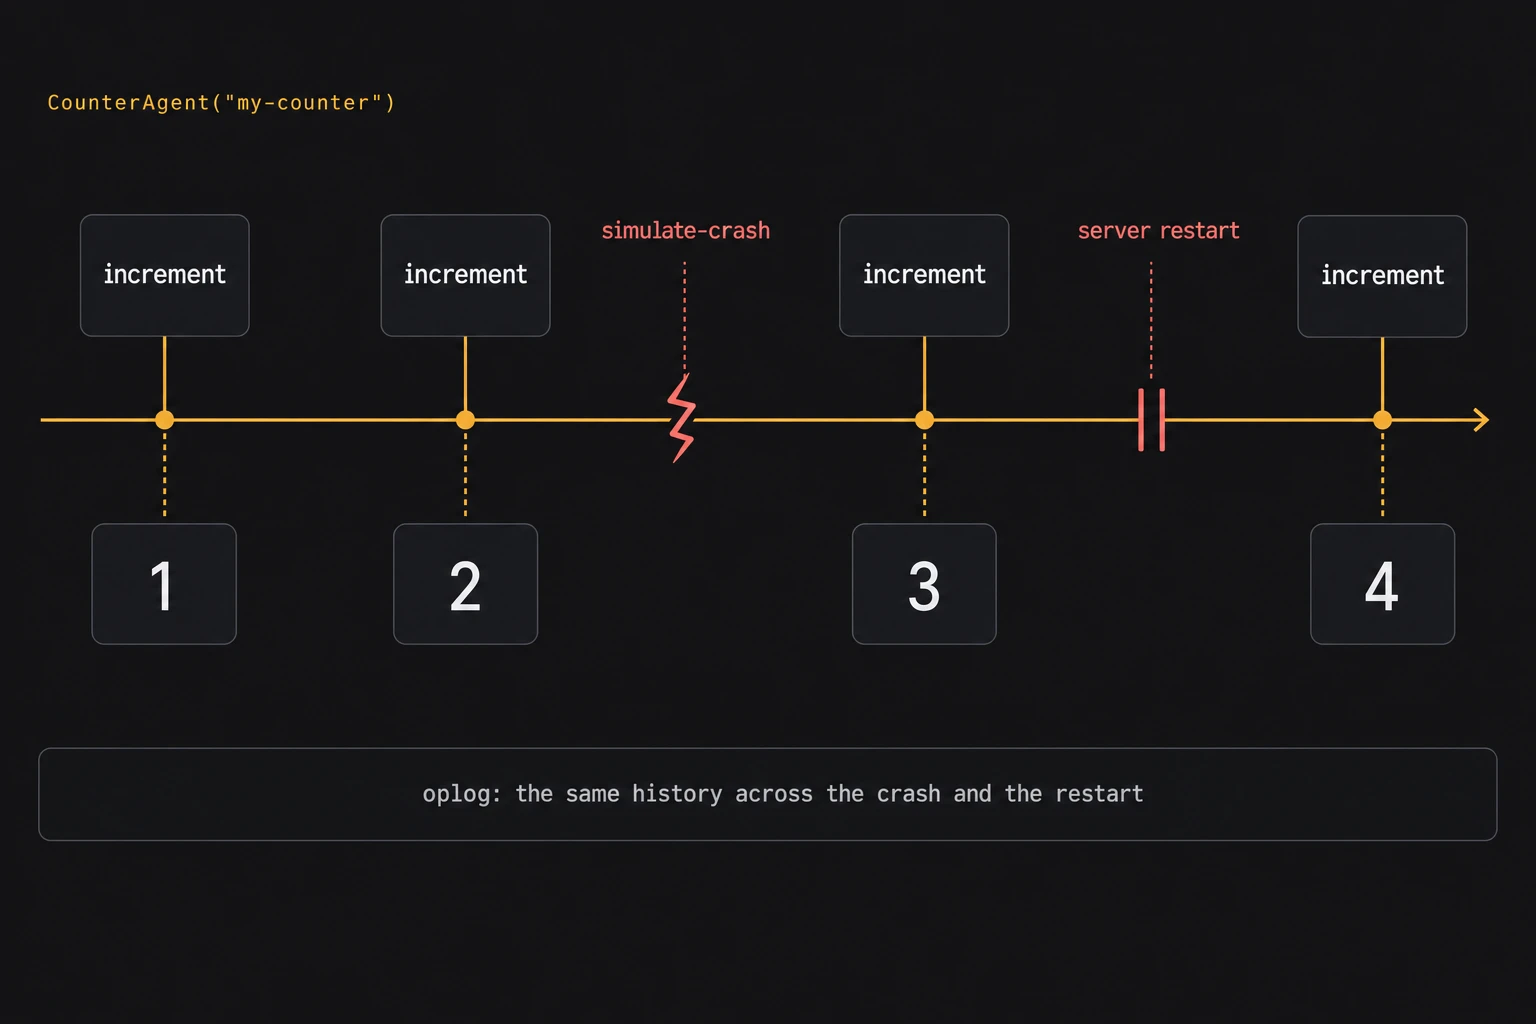
In this quickstart you run Golem on your machine, deploy a small counter agent, and call it four times. Between calls you crash the agent and restart the whole server. The counter still returns 1, 2, 3, 4, because Golem keeps the agent’s state without any database or save call in your code.
It takes about ten minutes once the prerequisites are installed.
 Open full-size image in a new tab.
 Open full-size image in a new tab.
Before you start
Install the golem binary
The golem binary contains the command-line interface and a complete Golem server that runs locally. Download the binary for your platform:
| Platform | Binary |
|---|---|
| macOS ARM64 | golem-aarch64-apple-darwin |
| macOS x86_64 | golem-x86_64-apple-darwin |
| Linux ARM64 | golem-aarch64-unknown-linux-gnu |
| Linux x86_64 | golem-x86_64-unknown-linux-gnu |
| Windows x86_64 | golem-x86_64-pc-windows-msvc.exe |
Rename the downloaded file to golem, make it executable (chmod +x golem on macOS and Linux), and move it to a directory on your PATH. Some systems block downloaded binaries until you allow them in the system settings. Check the installation:
golem --versionOn Windows, use WSL (Windows Subsystem for Linux) and follow the Linux instructions. Native Windows binaries are available to try, but Windows is not fully supported and operation is not guaranteed.
A lighter golem-cli binary without the local server exists for working against a remote Golem deployment; see the CLI reference.
Install the toolchain for your language
golem build compiles agents with the language’s own toolchain. TypeScript and Effect need Node.js 24.11 or newer and npm 11.6.2 or newer. For Rust, Scala, MoonBit, and Go, install the toolchain listed on the Setup page.
Start Golem locally
This walkthrough uses two terminals. Terminal 1 runs the server; Terminal 2 runs every other command.
In Terminal 1, from any directory:
golem server runThe first start downloads and provisions Golem’s built-in plugins and tools, so it takes longer than later starts. Leave the server running.
Create and deploy a counter
In Terminal 2, generate an application named agent-examples from your language’s default template. The default template defines a counter agent type with an increment method, so there is no code to write.
TypeScript
golem new --template ts --yes agent-examplesThe generated agent is ordinary code. Its state is a field, and increment changes it:
TypeScript
// src/counter-agent.ts (excerpt)
export const CounterAgent = defineAgent({
  name: "CounterAgent",
  id: { name: z.string() },
  methods: {
    increment: method({ input: {}, returns: z.number() }),
  },
});

export const CounterAgentImpl = CounterAgent.implement({
  init: () => ({ count: 0 }),
  methods: {
    increment() {
      this.count += 1;
      return this.count;
    },
  },
});The project also contains an AGENTS.md file and skill files with Golem-specific instructions for AI coding tools. golem templates lists every available template. Build the application and deploy it to the local server:
cd agent-examples
golem build
golem deploy --yes
--yes confirms the deployment plan that golem deploy prints. Deploying makes the agent type available; it does not start any agent.
Keep Terminal 2 in the agent-examples directory for the remaining commands.
Call the same agent twice
An agent is addressed by its agent type and its constructor parameters. CounterAgent("my-counter") names one agent; Golem creates it on the first call. In Terminal 2, from the agent-examples directory:
golem agent invoke 'CounterAgent("my-counter")' increment
golem agent invoke 'CounterAgent("my-counter")' increment
Effect: write 'Counter("my-counter")' wherever this page writes 'CounterAgent("my-counter")'.
Each command ends with the method’s result. The first call prints 1 and the second prints 2. Excerpt of the second call’s output (the label names the component’s language):
Invocation result in TypeScript syntax:
2
A different name, such as CounterAgent("other"), addresses a different agent with its own count starting at zero.
Crash the agent
Simulate a crash, then call the agent again without redeploying:
golem agent simulate-crash 'CounterAgent("my-counter")'
golem agent invoke 'CounterAgent("my-counter")' increment
The invocation prints 3. The crash discarded the agent’s running instance and its memory. Golem started a fresh instance and rebuilt the agent’s state from its oplog, the durable record of what the agent has done.
Restart the server
In Terminal 1, stop the server with Ctrl+C, then start it again without --clean:
golem server rungolem server run --clean deletes all local server data, including every agent and oplog, and would reset the counter.
When the server is running again, call the agent from Terminal 2:
golem agent invoke 'CounterAgent("my-counter")' incrementThe invocation prints 4.
Optionally, in Terminal 2, inspect the agent’s recorded invocations:
golem agent oplog 'CounterAgent("my-counter")'What the counter showed
| Property | What it shows |
|---|---|
| Identity | CounterAgent("my-counter") reached the same agent on every call. Its type and constructor parameters are its address. |
| Ordinary state | The count is an ordinary field. The code has no save call or database write. |
| Recovery | After the crash, Golem rebuilt the state from the oplog, with no redeploy or manual restore. |
| Persistent local server data | The local server keeps components, agents, and oplogs in a golem directory under the platform’s local data directory, so state survives a restart without --clean. |
Recover a method in the middle of its work
The counter’s state survived between calls. This second example shows Golem recovering a method that is still running. A WorkflowAgent starts a workflow, asks a HumanAgent for approval, and then waits inside its start method until the human decides. You restart the server while it waits, approve the workflow afterwards, and the method continues from the line where it stopped.
The example uses the human-in-the-loop template. The waiting is ordinary code: the method creates a promise, sends its ID to the human agent, and awaits it. In Terminal 2, leave the agent-examples directory, then follow the tab for your language. The idempotency key report-q3 identifies the waiting invocation, so you can ask for its result later.
TypeScript
// src/workflow-agent.ts (excerpt)
async start({ approver }) {
  const approvalPromiseId = createPromise();

  await HumanAgent.client.get({ username: approver }).requestApproval({
    workflowId: this.workflowId,
    promiseId: encodePromiseId(approvalPromiseId),
  });

  // The agent is suspended here until the promise is completed.
  const decision = new TextDecoder().decode(await awaitPromise(approvalPromiseId));

  return decision === "approved"
    ? `Workflow ${this.workflowId} was approved`
    : `Workflow ${this.workflowId} was rejected`;
},
cd ..
golem new --template ts/human-in-the-loop --yes approvals
cd approvals
golem build
golem deploy --yes
golem agent invoke --trigger --idempotency-key report-q3 'WorkflowAgent("report-q3")' start '"alice"'
golem agent invoke 'HumanAgent("alice")' listPendingApprovals
golem agent get 'WorkflowAgent("report-q3")'Invocation result in TypeScript syntax:
["<workflow-id>"]
...
Status: SuspendedIn Terminal 1, stop the server with Ctrl+C and start it again with golem server run. Then, in Terminal 2, approve the workflow, using the ID from the previous output, and ask for the result of the original invocation by repeating it with the same idempotency key:
golem agent invoke 'HumanAgent("alice")' decideApproval '"<workflow-id>"' '"approved"'
golem agent invoke --idempotency-key report-q3 'WorkflowAgent("report-q3")' start '"alice"'
Invocation result in TypeScript syntax:
"Workflow <workflow-id> was approved"The approval completed the promise that start was waiting on, and the method continued on a server that did not exist when it started. Repeating the invocation with the same idempotency key returned the recorded result instead of starting a second workflow, because a method invocation executes exactly once per idempotency key. Durable execution explains how recovery works, and Agent communication covers promises and waiting.